
Updated 10/5/21
Verified with WinRE and ADK version 10.1.22000.1 (for Windows 11) in SCCM 2107 CB.
My original guide was written using a 1607 image, then revised for SCCM/Windows 1906, and now again for SCEM 2107 with a Windows 11 Boot Image. My TechNet Article posted years ago has been referenced and copied many times–inspiring most of the blogs written on the subject since then–and is now locked for life.
This post will be the resting place for this guide, to ensure it can be referenced (and copied) by other ambitious IT Junkies like myself for the foreseeable future. Feel free to check in every 6-12 months as I update the instructions for every new Windows/Server/ADK version as they come.
Cheers!
Summary:
- Obtain a WinRE.wim image from a Windows 10 ISO version that matches that of your ADK/PE on the SCCM server. You must be sure the version of your SCCM Site supports the given RE/PE version.
- The ADK/SCCM version compatibility matrix can be referenced here: Support for the Windows ADK – Configuration Manager | Microsoft Docs
- An automated way to obtain the latest Enterprise ISO is available here.
- Obtain the Windows 11 Enterprise install.wim.
- Create a wireless profile in XML format.
- Create a script to call and connect to the wireless profile stored in XML format.
- Modify the built-in network management scripts used by SCCM/MDT for the Pre-Installation Environment (Recovery Environment, in this case).
- Modify the WinRE.wim image to support the wireless network stack.
- Modify OS image and Task Sequence steps to accommodate wireless connectivity.
- Load your wifiprofile.xml and connect.bat in %windir% during your OS configuration before capturing/syspreping the image with the SCCM Capture Media. This allows the Task Sequence to call the connect.bat after WinRE has exited.
Prep Work
Step 1 – Export Wireless Profile
The first step is to export the wireless profile of your choice to an XML and save it for later—WPA2 on a hidden network is what we use for our organization. The exported network profile is titled “wifiprofile.xml”. This file will reside in the boot image and in the system image to be deployed.
netsh wlan export profile <profile_name> key=clear folder=c:\wifiprofile
Step 2 – Create files
Create the following scripts/files and placed them in C:\TEMP\files on your SCCM server (or whatever your DISM working directory is). My working folders for DISM are as follows and all commands reference below will follow that convention:
- C:\TEMP
- C:\TEMP\boot
- C:\TEMP\files
Step 2, Script 1 – Connect.bat
%windir%\System32\wpeinit.exe -InitializeNetwork

net start wlansvc
netsh wlan add profile filename=%windir%\wifiprofile.xml

:loop
  ping IP.of.the.DP
  IF %ERRORLEVEL% equ 0 goto :connected
  netsh wlan add profile filename=%windir%\wifiprofile.xml
  netsh wlan connect name=YOURSSID ssid=YOURSSID | echo Connecting to YOURSSID
  ping localhost -n 7 >nul
goto :loop

:connected
ping localhost -n 7 >null
exit
Note that the above script is designed that, if the ping fails, the loop retries the connection until the DP can be contacted. This is because wireless is unreliable at times and if it connects a moment too slow (or not at all) the task sequence will fail all together.
Step 2, Script/File 2 – winpeshl.ini
[LaunchApps]

%windir%\connect.bat

%SYSTEMDRIVE%\sms\bin\x64\TsBootShell.exe
Typically this file has the ‘exit’ command at the end, which is removed for our purposes, and the last line points back to the task sequence initialization that we will skip in the TsBootShell.ini (next).
Side note: Why Both?
This next, redundant step exists because when a device boots into WinRE from the OS, it skips the winpeshl.exe phase of the boot sequence. The winpeshl.exe step is skipped because an answer file is generated during the “reboot into PE” step of the Task Sequence and the TS believes it has all the info necessary to initialize the network and proceed with imaging. However, it is not sophisticated enough to initialize the wlansvc because that service does not exist in a typical WinPE boot disk (remember, this is a WinRE boot disk which does have the wireless service stack).
The result, without the redundancy, is when a PC reboots from the OS into the Win Pre-installation Environment (Win Recovery Environment) for reimaging and skips the winpeshl.exe to go directly to TSBootShell.exe, our modified prestart.cmd will connect to the wireless THEN fire off the subsequent task sequence boot order of operations (steps 3 and 4).
I recommend thoroughly understanding the boot process and the logic behind the redundancy, covered in the next section. This will help you to troubleshoot connectivity/boot issues and help you to develop better processes (PSK Wireless WinRE Post Coming Soon).
Step 2, Script/File 3 – TsBootShell.ini
Purpose: Enables cold/network/media/Software Center (from OS) Wireless network boot.
[Shell]
OrgName=
EnableDebugShell=true
Run=%windir%\prestart.cmd
Redundancy – A Better Understanding
For a better understanding of the boot process and the significance of these files, you can refer to this article (credit to the author for helping me put some missing pieces together).
In the event that post gets lost to time, here is an illustration followed by a brief summary:
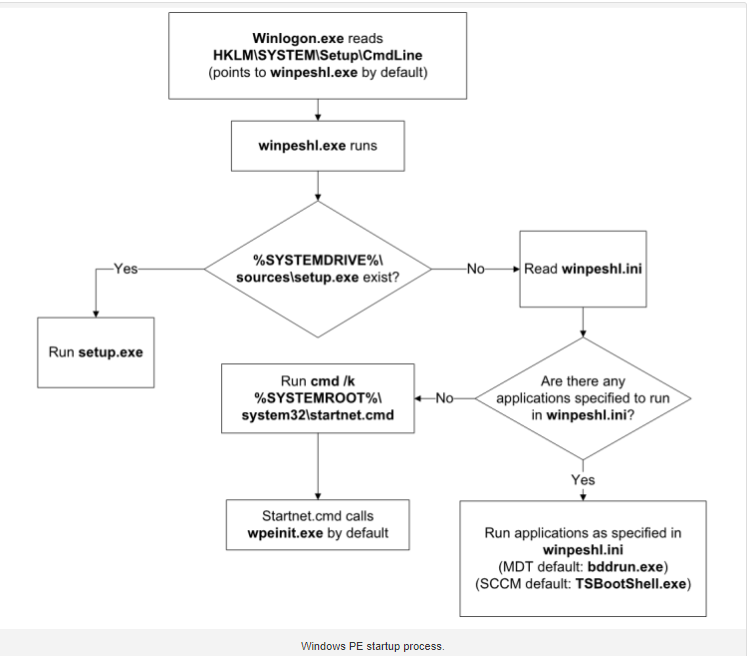
During a boot from a Task Sequence Media or PXE, the boot process starts with the winpeshl.exe. If no network adapters are ready by the time winpeshl.exe finishes execution, the TS will fail.
In our case, the winpeshl.ini now calls the connect.bat which initializes the network and starts the wlansvc, enabling a functional network interface. Once our connect.bat has established a ping to our DP, winpeshl launches the TsBootShell.exe.
The auto-generated TsBootShell.ini typically has one command in it to run tsmbootstrap.exe and kick off the GUI and/or proceed with policy retrieval (if unattended). This is why we replace that line with “run=%windir%\prestart.cmd” and our prestart.cmd is nearly the exact same as our connect.bat but with the addition of the TsmBootstrap command to start the Task Sequence process.
Script 4 – prestart.cmd
%windir%\System32\wpeinit.exe -InitializeNetwork

net start wlansvc
netsh wlan add profile filename=%windir%\wifiprofile.xml

:loop
  ping IP.of.the.DP
  IF %ERRORLEVEL% equ 0 goto :connected
  netsh wlan add profile filename=%windir%\wifiprofile.xml
  netsh wlan connect name=YourSSID ssid= YourSSID | echo Connecting to YourSSID
  ping localhost -n 7 >nul
goto :loop

:connected
ping localhost -n 7 >null

Run=X:\sms\bin\x64\TsmBootstrap.exe /env:WinPE /configpath:%CONFIGPATH%
Script 5 — startnet.cmd
%windir%\connect.bat
wpeinit
Step 2 results:
The following 6 (six) files should be located in C:\TEMP\files on your SCCM server:
- Connect.bat
- Wifiprofile.xml
- Winpeshl.ini
- TsBootShell.ini
- Prestart.cmd
- Startnet.cmd
Obtaining and Building the Image
Step 3 – Extract the WinRE Image
Next, you’ll need to mount an ISO for Windows 10 Windows 11, extract the sources\image.wim and place it in the directory you use for DISM/image management—my chosen DISM working folder is C:\TEMP and all commands referenced below will follow that convention.
Mount the Win10/11.iso associated with ADK version of your SCCM Server.
Common Mistake:
I cannot stress how common this is – make sure your SCCM version supports the Windows ADK version of the Windows 10/11 RE version.
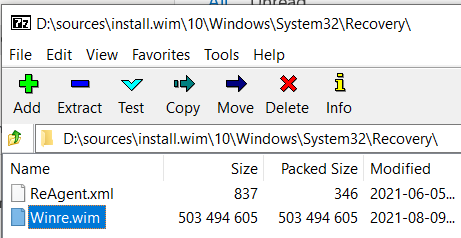
Using 7zip, open the install.wim in D:\sources\install.wim of your mounted Windows 10/11 ISO.
Copy the Winre.wim to C:\TEMP on your SCCM Server:
Windows 10: D:\sources\install.wim\10\Windows\System32\Recovery\Winre.wim
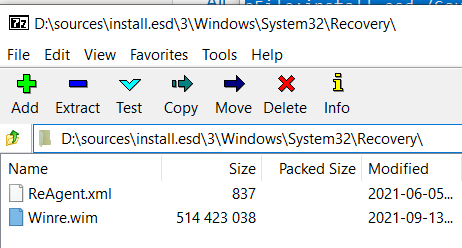
Windows 11, Enterprise: D:\sources\install.esd\3\Windows\System32\Recovery\
Note: The image index ‘3’ in the path above is for Enterprise, if you downloaded the ISO following the guide provided here. All of the Winre environments are the same, regardless of the image version.
Step 4 – Preload the WinRE Image
The following commands mount the image, copies your files, then commits the changes to the image. Driver injection and additional customizations can be done in the SCCM console.
Side Note: I have not changed these command lines and files since the summer of 2017 – whenever I get a new ADK version and run through this blog, I copy-and-paste and it works magnificently. The only thing that has changed is the password in with wifiprofile.xml.
## Start of Command Line Tools – Command Prompt as Administrator ##

cd C:\TEMP\

"C:\Program Files (x86)\Windows Kits\10\Assessment and Deployment Kit\Deployment Tools\amd64\DISM\dism.exe" /Mount-Image /ImageFile:c:\temp\WinRE.wim /Index:1 /MountDir:C:\temp\boot


copy files\wifiprofile.xml C:\temp\boot\windows\

copy files\connect.bat C:\temp\boot\windows\ /y

copy files\prestart.cmd C:\temp\boot\windows\ /y

copy files\TsBootShell.ini C:\temp\boot\windows\ /y

copy files\winpeshl.ini C:\temp\boot\windows\System32\ /y

copy files\startnet.cmd C:\temp\boot\windows\System32\ /y


"C:\Program Files (x86)\Windows Kits\10\Assessment and Deployment Kit\Deployment Tools\amd64\DISM\dism.exe" /Image:c:\temp\boot /Cleanup-Image /StartComponentCleanup /ResetBase

"C:\Program Files (x86)\Windows Kits\10\Assessment and Deployment Kit\Deployment Tools\amd64\DISM\dism.exe" /Unmount-Image /MountDir:C:\TEMP\boot /commit
Step 5 – Copy files again.
The two following files we are about to copy are automatically injected by SCCM during the distribution of the content (the WinRE.wim image) which is why they are stored in C:\Program Files\Microsoft Configuration Manager\OSD\bin\x64\ as well as manually loaded into the WinRE.wim image in the steps above.
Failing to copy these files will cause the task sequence to fail. The following commands place these files in the necessary locations to be injected into the image during distribution in SCCM.
## Start of Command Line Tools ##

copy files\winpeshl.ini "C:\Program Files\Microsoft Configuration Manager\OSD\bin\x64\" /y

copy files\TsBootShell.ini "C:\Program Files\Microsoft Configuration Manager\OSD\bin\x64\" /y
These files also enable this image to support a Task Sequence (full OS deployment) over WiFi Via-SCCM Client on the OS so no cold-boot with USB media is necessary when reimaging/upgrading.
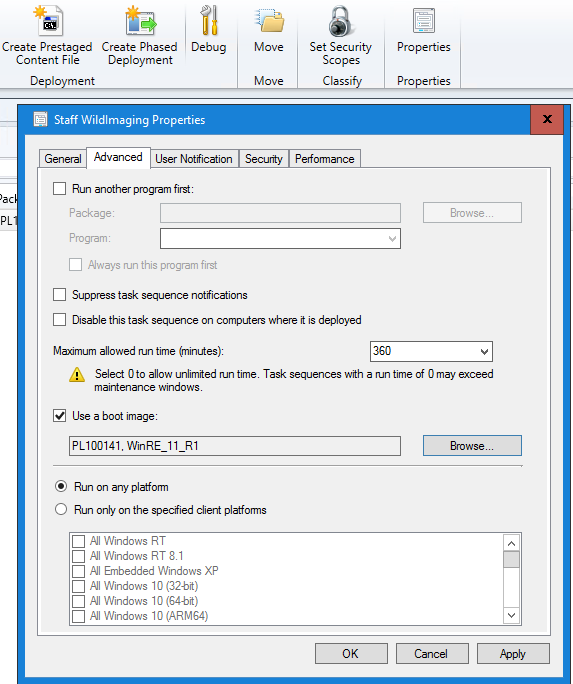
Step 6 – Adding the boot image
Add the newly modified boot image to SCCM but before you distribute it, edit the properties.
Step 6, Part 1
Add any additional (wireless/network/storage) drivers to your image. I do not practice injecting the drivers into the image using DSIM anymore since using the SCCM console enables me to keep track of what I’ve added!
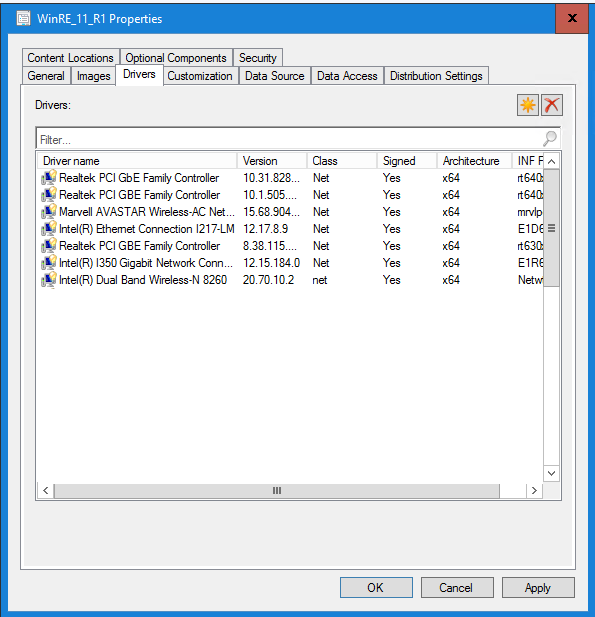
It also ensures those drivers exist in SCCM for installation during the task sequence so that the device remains connected after exiting WinRE.
While in the image properties, configure a prestart command—a very important piece!
The prestart command to use is:
cmd /c net start wlansvc & cmd /c netsh wlan add profile filename=%windir%\wifiprofile.xml & cmd /c netsh wlan connect profile=YOURs ssid=YOURSSID
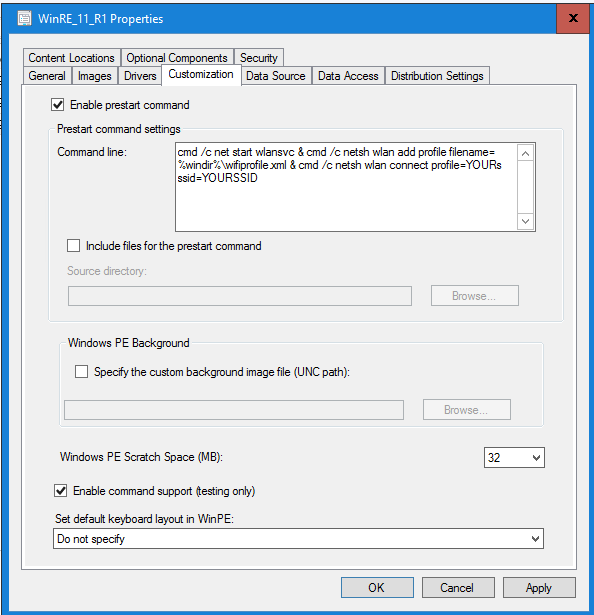
The result of the above command is starting the WLAN service, importing the WiFi profile (from our variable location) then connecting to the provided WiFi network. I also Enable command support so I can press F8 during the Task Sequence and verify connectivity and test other functions.
Distribute your content and assign it to the Task Sequence – this will enable the prestaging process when reimaging a PC from the OS.
Step 7 – Staying connected during the Task Sequence.
Both the wifiprofile.xml and the connect.bat need to be in the OS image prior to capturing, or injected using DISM. They need to be placed in the C:\Windows\ Directory. When building the reference image (as lightweight as it may be), be sure to prestage these files accordingly.
Step 7.1 – Preload the OS Image.
Using the following commands, you can mount your Windows 11 OS Image that you collected from the Windows 11 ISO and copy the necessary prestaged files.
"C:\Program Files (x86)\Windows Kits\10\Assessment and Deployment Kit\Deployment Tools\amd64\DISM\dism.exe" /Mount-Image /ImageFile:c:\temp\Win11.wim /Index:1 /MountDir:C:\temp\boot


copy files\wifiprofile.xml C:\temp\boot\windows\ /y

copy files\connect.bat C:\temp\boot\windows\ /y


"C:\Program Files (x86)\Windows Kits\10\Assessment and Deployment Kit\Deployment Tools\amd64\DISM\dism.exe" /Image:c:\temp\boot /Cleanup-Image /StartComponentCleanup /ResetBase

"C:\Program Files (x86)\Windows Kits\10\Assessment and Deployment Kit\Deployment Tools\amd64\DISM\dism.exe" /Unmount-Image /MountDir:C:\TEMP\boot /commit
Step 7.2 – WiFi Reconnect
Configure a “run command line” Task Sequence step that calls on the connect.bat after every reboot. This will keep the device connected throughout the entire imaging process.
NOTE: This is why your wifiprofile.xml and connect.bat MUST be in both the boot.wim and the OS image.wim in order to be called upon after WinRE has exited.
Step 8 – Create Task Sequence Media
For devices that need a cold-boot image with no Ethernet connection, you will need to use a USB thumb drive or disk media.
While creating the Task Sequence Media, enable the prestart command and use the following:
netsh wlan add profile filename=%windir%\wifiprofile.xml & netsh wlan connect name=YOURSSID
You can then use a tool such as YUMI to load the ISO onto a thumb drive.
Step 10 – Test a Task Sequence
Using this process, a PC will cache the WinRE boot image while booted in Windows, reboot at the assigned time and connect to WiFi to run the Task Sequence for remote reimaging of devices.
I have used this method to cold-boot via-USB, and reimage from the desktop for 6+ years. OS upgrades or fresh-install task sequences can be performed ether way.
The process takes a while depending on the size of the task sequence. My standard deployment with all the bells and whistles takes 10-20 PCs roughly 3-4 hours over wireless so ensure your maintenance windows are long enough to accommodate and your networking team isn’t planning any changes that night.
The key to success all those years ago was using WinRE from a Surface Pro 2 rather than WinPE, as Windows Recover Environment supports wireless imaging for Surface Pro devices to restore from the cloud.
Step 10 – Clear sensitive data The last task sequence step during any of my OS deployments is to remove the wifiprofile.xml from %windir% as it is stored in plain text.
del %windir%\wifiprofile.xml
Step 11 Have a drink!
Not sure why Microsoft has made this so difficult but there it is, wireless imaging with SCCM (with obvious future proofing).
5 comments
I have setup a ts exactly like how you detail.
However the ONLY change or question i have is – did you use a command line for: Setup Windows and Configuration Manager – or did you use the pre created client package from sccm
as i see you have a restart after.
I use the pre-created client package from SCCM. That reboot task is placed there as an example to illustrate how a “Connect Wireless” TS Step is required after each reboot in the process.
Hope this guide was helpful and were successfully wirelessly deployed an image!
Cheers!
Hi, can you do a video explaining the entire process and upload it to YouTube please.
I would like to address two points regarding the process of enabling Wi-Fi support on WinPE:
1. The prestart command fails = cmd /c net start wlansvc & cmd /c netsh wlan add profile filename=%windir%\wifiprofile.xml & cmd /c netsh wlan connect profile=YOURs ssid=YOURSSID
The failure is due to the incorrect use of netsh wlan connect profile. The correct command should be:
Correct line will be netsh wlan connect name
So the modified line will be – cmd /c net start wlansvc & cmd /c netsh wlan add profile filename=%windir%\wifiprofile.xml & cmd /c netsh wlan connect name=YOURs ssid=YOURSSID
2) I noticed the following line inside the prestart.cmd file.
Run=X:\sms\bin\x64\TsmBootstrap.exe /env:WinPE /configpath:%CONFIGPATH%
a) Do I need to include the line starting with Run= as you mentioned?
b) Additionally, what should be the value of %CONFIGPATH%? Do I need to define this variable within the prestart.cmd file?
So, for point A, yes, you do need to include “Run=” in the prestart command. For question B, this is pre-defined by SCCM and doesn’t need to be set or changed. Leaving as many things default as possible, the simplicity mitigates technical debt as the environment/systems change.
Cheers!